

 Tinna Thórudóttir Thorvaldsdóttir's Ravelry Store


Tinna's Super Border Pack
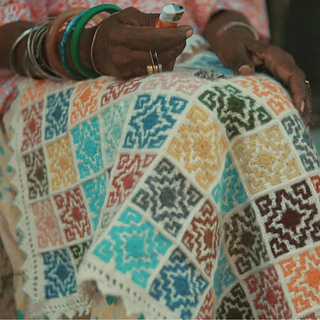
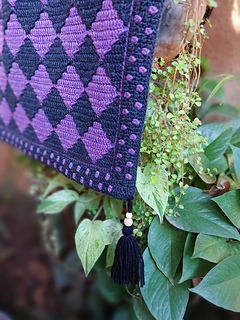
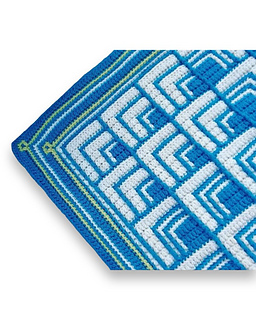
A compilation of ALL my 21 different mosaic crochet border designs, including one brand new design, only available in this pack! This way you can mix and match and use the different border designs for various crochet projects.
I’ve been publishing mosaic patterns in English now for over 7 years, many of them are blankets and most of those come with a specific border design. I love seeing when people get creative with my patterns and have seen many beautiful pieces where you combine my border designs with other blanket designs, so I thought it would be cool to give you the option to get ALL 11 of my various border designs in one pack plus 1 new I made special for the occasion! Many of my border designs then come with 2 or more variations, so in total you get 21 border options in this super pack! Full disclosure, one of the borders is not in mosaic crochet technique, it’s just a pretty little frilly border that I love using for baby blankets. That’s the one I used for my Baby Saga Blanket.
This way you can mix and match as you see fit, or even just do a plain blanket with a decorative border. Shhhh, that’s a secret still, but I may or may not be working on one of those!
For the time being, here I have combined all my borders for you to use as you see fit in this Super Border Pack and am looking forward to seeing the beautiful creations you will make.
Some of the border pattern come with both charts and written instructions, others are charts only. Check out my video tutorial for how to read my moasic charts over on YouTube if you need practice in reading the charts only, it‘s crazy simple!
Some of my borders only have patterns on the corners and then just stripes on the sides, these are obviously the easiest to fit and you don´t need to worry about the stitch count.
When working the borders that include patterns all along the sides, the only other thing you have to keep in mind is that the border designs vary when it comes to the stitch count in the pattern repeats, so you‘ll have to keep this in mind when fitting each border to your piece. You can often fudge the stitch count a bit in the first couple of rounds of the border, before the pattern start.
The absoloute easiest are the simple double border and the striped double border, those are the two border instructions you will find in this file here.
Plus one extra, that I made specially for this occasion. That one is called CORAZÓN and comes as a chart only border, with written instructions on the stitch count and where to start. I haven´t even made the new one myself! Just drew it up as a little extra treat for you guys.
The other 11 borders included in the Super Pack are then included in the pattern in separate files for each border, I think it‘s just easier like that. Note that all my other borders rely on the foundation round and backside of the border being made the same way I show you here in the simple border.
Abbreviations (US terms):
ST = stitch/stitches
SS = slip stitch
CH = chain stitch
SC = single crochet
DC = double crochet
DC2tog = 2 double crochet stitches worked together
Colours
You will need at least two colours, and I recommend using contrasting colours. You can either just work this with two colours like traditional mosaic crochet or mix it up and either switch one or both colours once you start with the next row of triangles.
Many of the border patterns come with user-friendly charts. If lefthanded, you can follow the chart from left to right no problem, it´ll look the same.
Mosaic Crochet Technique
Do check out my beginners guide to mosaic crochet over on youtube if you havent tried this technique before, it really is silly easy!
https://www.youtube.com/watch?v=HTigdTvdTLQ&t=3s
When working the mosaic patterns, each row is worked with only one colour at a time. I recommend always using contrasting colours for A and B, that way the patterns pop more.
All the border designs here (except for 1) are crocheted with the mosaic crochet technique:
All single crochet stitches are worked in the back loop of a stitch, unless I specify otherwise like in the new Corazón border.
All double crochet stitches are worked in the front loop of a stitch in the row below the one you would normally crochet into. That is, in the corresponding stitch right below the stitch you would normally crochet into, one row down. For example, the double crochet stitches from Row 4 are worked into stitches in Row 2, DC stitches from Row 5 are worked into stitches in Row 3, etc. When working the double crochet stitches, you just yarn over and insert your hook from below in the front loop of the corresponding stitch below and then work a normal DC in that stitch. See the illustration on this page. This way you get this unique mosaic pattern. Because the mosaic pattern is worked this way, always from the front side, the pattern only appears on front side of the Afghan, and the back side is striped.
Yarn & hook:
You can use any yarn you like for these designs and a hook that suits your yarn. Some of the border designs come with some yarn stats per different sizes I have included in the original patterns. You can use these for guidance, but ultimately you will have to be independent in this regard when using different border designs for different sized blanket’s and pieces. It is virtually impossible to give you yarn stats when those depend entirely on the size of the projects you are framing up!
Now, the borders for mosaic crochet is usually made double, so that the ends you have at each side of the mosaic piece when working it flat are hidden inside it. I also like how it gives the blanket a nice finishing touch. Note that if your piece is worked in the round, either as one big piece or joined squares, then you don’t need the double border to hide any ends and can use only the front side.
The trick to the double border is to first crochet one round with slip stitches, all around the border of the blanket, and the second rounds (in the frond and the back) are worked into the slip stitches. The back side into the back side of the slip stitches and the front side into the front side. Then you work both sides normally from each side. It’s a bit difficult (and honestly rather tedious!) to work that first round of the backside into the back side of the slip stitches, so I recommend that you start by working the first round of the back side first, before working the front side. If you do it the other way around, the slip stitches get tighter, and it makes it even more difficult to work into the back side. After this first round, the border is a breeze, so just power through!


